(Last updated January 2023) – Operating the projector is not always as easy as operating the television unit. There are some things that you need to do before you can use your projector. It may sound painstaking, but if you do it correctly, you can enjoy a properly functioning device. The quality of the images will also be much improved.
Before you can start using the projector, find the most appropriate location. It is not all spaces that you can refer to as necessary. You will need a functional area that the device will fit properly and some distance for projecting the image.
You can either choose to project the images on a screen or a blank wall. However, a screen is much better as it produces the best quality images. You can still choose a blank wall, but you may have to deal with such fixtures as a power switch. Such can affect the quality of the final image which some of us may not be comfortable with.
You also have the option of choosing the size of the projection. It can be as big as you want but remember that the image is too big, the quality will be reduced as well. Choose the size of the projection taking into account the quality and comfort level. Please note that more prominent projections will need you to move backward. That means you will need to consider interruptions that may come in between the projector and the display. Nothing should come in front of the screen.
The next important step is setting up a screen. Of course, you can choose to use a blank wall, but a screen is much better. A screen can amplify and reflect the light from the projector much better than a blank wall. You will, therefore, get a brighter image with a screen than with a blank wall.
Getting the right size of the table mount is necessary. The ideal situation is where the table is not too tall or too short to affect the quality of the projection. It should support the centering of the image. In other words, the lens should be at the center of the display image.
It is now time to make the connections. Depending on the device that you are using, use the right cables to make the connections. For example, if you are using modern appliances such as a game console, DVD player or even a laptop, you will most likely need to make the HDMI connection. However, if the HDMI connection is not available, you may need to get an adaptor. There are numerous adaptors that you can choose from on the market. The HDMI to VGA adaptor is one of the most common.
Switch on everything after you make the connections.
Most of the projectors have a built-in test image that you can use to align appropriately. If you don’t find the image, then you can always download it from the internet. You can also purchase a setup disc.
You will need to line up the center of the disk with the center of the image. The lines of the images, as well as the far edges, should align perfectly. Ensure that the entire screen is filled.
Make good use of the zoom control to make the necessary changes and align the image correctly. Also, take note of the focus and make sure that the image is crisp and clear. If the angle cannot go away, you still have the option of using the Keystone control.
The last step is to select the picture mode. In most cases, the ideal picture mode is a cinema or movie. If the projector is in an environment with ambient light, then a brighter mode will be sufficient.
How Does a Projector Work?
Table of Contents
Projectors are popular devices that make it possible to watch high definition movies and videos. They use lenses, chips, color wheels, and other mechanisms to convert a beam of light into images.
Among the three types of projectors, technologies include LCD technology. The first panel on the LCD projectors split the light beam into its primary colors. The separated light is then recombined with another panel into spectra depending on what is allowed to get through.
Every panel reflects a different color, and the last one bends the light based on the level of electrical current. The last dichroic mirror combines all the light colors which are then magnified by the lenses and projected to the screen for your viewing.
On the other hand, DLP projectors make use of a DMD chip that has millions of micromirrors. Every mirror on the chip represents one pixel of color. The spinning color wheel together with the mosaic effect of the micromirrors is what creates the exceptional images.
The latest projector technology is the Liquid Crystal on Silicon. It is one of the most complicated and most expensive technology uses on projectors.
Liquid Crystal on Silicon is a hybrid technology of 3-chip LCD and DLP technologies. It combines the best of both technologies. The clarity and color reproduction associated with the liquid crystal on silicon technology is unmatched. However, it can suffer from motion blur problems which you cannot get with DLP technology.
How Does a DLP Projector Work?
Digital Light Processing is one of the popular projector technologies (read here about 4k projectors). The company behind the technology is Texas Instruments. DLP is mostly popular in projectors, but it can be used in other video platforms.
The technology functions when the light from a lamp goes through the color wheel and jumps off the DMP chip. The DMP chip is a single chip.
A DMP chip has numerous small tilting mirrors that create reflected light patterns that display on the screen. The effectiveness of digital light processing technology is the multiple tilting micromirrors. The micromirrors can be more than 1 million depending on the resolution of the display. It also depends on the tilting speed.
The micromirrors tilt very rapidly when the image falls on the DMP chip. The high-speed spinning color wheel adds color. The combination of the fast-spinning color wheel and the extent of the tilt of every micromirror determine the quality of the final image.
How Does a Hologram Projector Work?
Instead of using graphic images, hologram projectors use holograms to project pictures. As a result, it is possible to project images into space rather than on a screen. It can be two dimensional or three-dimensional images.
However, you are going to need laser-based projectors to view three-dimensional images. It means that you can view these images from different angles and they can seem real.
In the old projectors, some of the light is blocked by the image, and it creates some shading as a result. In contrast, the holographic projector uses refraction through an interference pattern, and none of the light is lost. Therefore, the image is more precise and refined.
As a result, the orographic project does not produce a lot of heat. They can also be very compact to make them appropriate for mobile applications.
The interference pattern used in holographic projectors only works with one color. So, how do the other colors emerge in the final image?
To get the full color, the individual interference patterns work together with colored lasers for illumination.
How to Clean the Projector Lens?
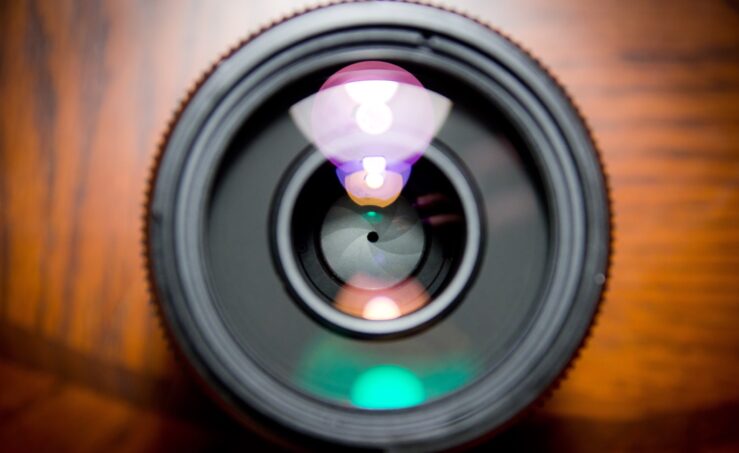
The projector lens should be clean so that it produces clear images. Dust and other things like fingerprints can affect the quality of the final image displayed. Therefore, it may be necessary to clean the lens to have clear and crisp images. So, how do you go about it?
Before anything, you will need to turn off the projector and allow it to cool off. The device should be cool to the touch. Furthermore, make sure that it is disconnected from the mains socket.
Don’t use any harsh chemicals that may be abrasive as they can damage the lens. Tissues and paper towels can seem like the most appropriate to use but avoid them like the plague. They contain hard fibers that are likely to scratch the lens. And as you are aware, it is impossible to get rid of scratches on the glass.
Use a non-abrasive solution to get rid of any dirt buildup on the lens. Avoid using alcohol and don’t apply the solution directly to the glass. Instead, implement the solution with a lint-free cloth that you usually obtained from a camera shop. The photographic lens brush is also appropriate for cleaning off any dirt buildup.
Use the cloth in a circular motion and make sure not to touch the lens with your bare skin as the oil on it can leave a mark on the surface of the glass. If you are not planning on using the projector at that moment, it is always good to replace the lens cap. It keeps the lens in good condition.
Some of us live in dry and dusty places. And as a result, using the necessary cleaning solution can prove to be a daunting task. So, how do you make sure the lens is clean so that you can enjoy your movie?
The solution to this problem is to buy the appropriate type of compressed air designed for lenses. Your local photography store has a good idea where you can get that kind of compressed air. They might even have it in stock.
Before you can spray the compressed air, be at least 7 inches from the lens to prevent eventualities that may cause cracking.
How to Watch TV on a Projector?
The quality of display from projectors may be enough to make one enjoy a particular movie. However, making the connection between the TV and the projector can prove challenging for some people. But the results make the struggle all worth the effort. So, how do you go about making the connections to your projector to enjoy your favorite programs?
Before anything, consult your projector manual to determine such issues as the distance from the screen and the most appropriate connections. Different models have different connections, and sometimes you may need adaptors to make good connections.
Locate the ‘video out’ jack on the TV and use a cable to connect to the ‘video in’ jack on the projector. Depending on the model, the various connections can be at the back or sideways.
There are different types of connections depending on the model and the type of device. The most common connections include HDMI, RCA, and VGA.
After making the connections, switch on the TV and the projector. Pull up the menu using a remote control or directly from the TV controls and choose the “Enable Video Out” option. It can also be “Auxiliary Video Out” depending on the type of TV.
Access the settings menu on the projector and choose the input source to be the jack or port through which you made the connection. For example, if you used HDMI, then select HDMI from the menu list.
You are now ready to watch your favorite programs using the projector. Enjoy it.
How Many Lumens is a Good Projector?
There are various factors that you need to consider when buying a projector. Among the most important is the number of lumens that the projector has. The thing is, the higher the number of lumens, the brighter and more precise the projector. We all want the best equipment to enhance our viewing experience. So, how many lumens is ideal for the projector?
If you are going to use the projector in a dark room, then something like 1000 to 1200 lumens is not so bad. However, conferences and lecture rooms and need about 2500. For the large auditoriums and conference rooms, you will need about 4000 lumens to project a clear image that everyone can see.
And if you are going to project large images, then it is critical that you have a projector with a high brightness rating.
Therefore, consider your application, the size of the room, the number of people in the group and the size of the screen.
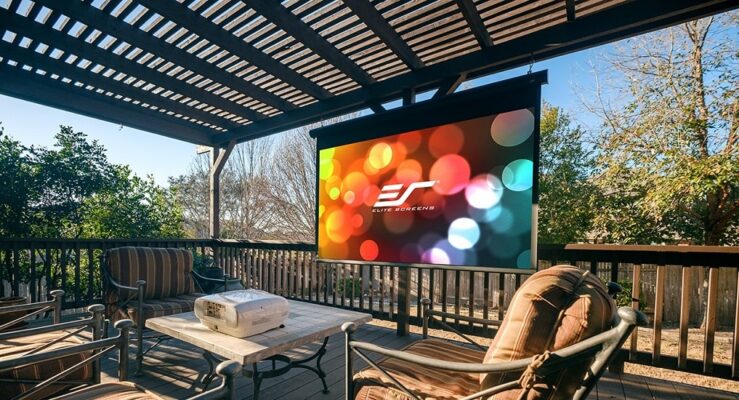
How to Use a Projector Outside During the Day?
- i. Related article: How to set up a projector
ii. Is Projector Safe for Your Eyes?
But nothing is impossible. They are good quality projectors on the market that can display bright and crisp images on the screen and you can finally enjoy that movie or presentation outdoors. Having a projector doesn’t mean you cannot enjoy the cool breeze of the outdoors. But what should you look for when choosing the right projector to use outdoors during the day?
Experts recommend a projector with more than 5500 lumens for a clear image. Furthermore, a good sound system that may be in-built enhances your viewing experience. Good images without good sound are never the perfect combination.
Make sure that the projector produces bright images more than anything else. However, you will need to place the screen and the projector in the shade.
How to do Projection Mapping
The magical and immersive experience associated with projection mapping produces making it increasingly popular. However, the challenge comes in doing useful projection mapping.
You will need a mid-level 3D modeling software technique to do an effective projection mapping successfully. The goal of projection mapping is a dynamic visual display that is much better than the dull single screen display. You can bring objects such as buildings to life if you do projection mapping effectively.
And while you can use a variety of methods to achieve the goal of the immersive viewing experience, proper technical planning, and a creative mind are critical. You will also need to be good in 2D as well as 3D effects, and animation processes.
The first process is choosing the right type of inverse and preferably translucent plastic material. This type of content creates an ethereal feeling in the projection mapping technique. Take your time to choose the right canvas to get the most appropriate results.
The next step is to brainstorm on what you want to project. For this process, you will need to create numerous sketches and take your time to create something beautiful. Consider the location that you are going to display the immersive projections. It is also nice to think about the audience.
The scale should not be too big, or the display will be too diluted to make it exceptional. It should also not be too small, or it will not be effective. You will need to learn parametric modeling to tweak the parameters and get the required results.
When you are satisfied with the model, you can move on to building the actual structures using the various screens sourced earlier. The translucent plastic covers may come in a large roll, and you will need to cut them into size. Number the sheets and cut two pieces of wood for the top and bottom part of the screen. The wood will help maintain the shape of the screen.
To hold the sheets up, you can use strong fishing lines. Attach them to the ceiling and anchor to the floor to prevent them from flying around aimlessly.
You will need good projectors and laptops to create the perfect modeling that is according to preference. Where you place the projector is essential, and it will be determined by its throw rate. If necessary, get as close as possible.
You can use two projectors but make sure that none of the panels are intersecting. Market this ideal location of the projectors so that you can recreate it numerous times.
Startup the Resolume Arena to create masks for the panels. The number of masks will depend on how many projectors you have. Typically, the masks will help you get a good picture of what the projectors are seeing. You see what the projectors see.
Set the mask as background in Cinema4d and place the Cinema4d camera in a position that matches that of the projectors. Move and rotate the cams so that you can get the appropriate digital scene that you want. This may prove a hard task, but you can successfully do it.
The next step is where creativity matters significantly. However, you can download content from other people that don’t mind. Adobe After Effects is an excellent tool that you can use to create your own content. Play around with various ideas, and you can achieve what you desire.
The substance of the projection mapping all comes down to this step. Determine which angle you want the viewing to be and make changes to that effect. After deciding on the angle, add a third cinema4d camera to represent the audience. You can change the cinema4d camera to the camera mapping by tagging it and use it to project content on the software.
The last step is to render what the virtual cameras are seeing. Don’t forget to render according to the resolution of the projector.
What is the Projector Throw Ratio?

The throw ratio is one of the most important considerations when it comes to buying a projector. It determines the quality of the projector and how effective it can be in displaying the images.
The best definition of the throw is the distance between the screen and the lens. The actual ratio is the relationship between the width of the display and the range of the throw.
This measurement is essential as it tells you how far you need to place the screen or how closely the projector should be to the screen to get a full-sized image. If the throw ratio of your projector is 2.4:1 and the screen is 10ft, then you will need to place it 24 ft.away to get a clear and full image display.
How to Calibrate a Projector
Projectors are quite crucial in boardrooms and lecture rooms. The devices look professional, but the quality of the display can determine whether the quality of the final presentation is worth the investment. To get the best out of your projector, you will need to calibrate it.
Most projectors come with default calibration which in most cases is imperfect. Therefore, you will eventually need to get into the center of it and do the calibration.
There are various ways to calibrate the projector, and the most common is through settings. You can also use such software as Spider 3 Elite or Optical Sensor Calorimeter. Other software includes i1Pro Spectrophotometer, i1Beamer, and Color Munki Photo. If you choose to use the software, please note that you will need an actual connection between the computer running the software and the sensor. You will also need to follow the tutorial or manual to do it the right way.
The five elements that you need to calibrate for the best image or video include contrast, color, brightness, sharpness, and tint. Before you can start calibrating, make sure to warm up the machine and then connect to the DVD player or computer. You will need a high-resolution image to use in the calibration process. It should not be hard to locate such an image.
Brightness is the first critical element to calibrate. To go about it, select brightness or black level from the menu. Start with the maximum intensity and then gradually lower it to the level that you feel is natural. It should be comfortable for you.
To calibrate the contrast or the white level, start with the lowest brightness settings and go up as is necessary. Make sure to reach a level that you feel is natural for you.
The saturation or color settings will need you to start at the highest level. It should appear bright red. Bring it down as it is necessary until you feel that it is comfortable.
The tint level affects the performance of the image or video. Start at the maximum level and go down as you have done with the others.
Play around with sharpness until you feel the colors are natural. The overall image should be comfortable to look at.
Will the Projector Work During Daylight?
Most of the projectors work effectively in a dark room. However, some of them can still work in daylight. But it is a long shot.
Project task that can work effectively during daylight has a high number of lumens. For example, the most appropriate number of humans is above 5500. Anything lower will not be sufficient.
How Many Lumens for a Projector?
The number of lumens that you can consider appropriate all depends on the application. For example, a home projector that you use to watch movies in a dark room can be about 2000 lumens. However, a large auditorium or boardroom will require higher than that. The above 5000 will do.
Why My Projector is Getting Hot?
Some projector models can get hot because the bulbs are high wattage. The density is another cause of heating. Projectors have many tiny mirrors and other components between the image and the lens. However, the primary source of the heat is traditional bulbs and lamps. They are not energy efficient.
As a result, the bulbs can reach high temperatures of about 300 degrees and are hot to the touch. Therefore, it is critical that the projectors have free space around them. Nothing should stand in the way of a good flow of air.
Always keep the area around the projector free from debris and clutter. Fresh air is critical.
How to Connect the Phone to the Projector Using USB
Smartphones are now some of the most essential devices in contemporary society. You can store your most essential documents and videos that you consider essential. Even better, it is now easier to display those files using a projector for a bigger audience.
Among the various ways that you can connect your phone to the projector is using USB.
To go about it, switch off the phone or tablet and study the USB port that it has. There are different devices on the market, and they use different types of USB ports. Consider whether the USB ports are compatible with those of the projector. If they are not, you are going to need an adaptor. An example of a suitable adaptor is Apple’s VGA adaptor.
Connect the cable to the input port of the projector. Also, connect it to the output port of the phone. If you need to use an adaptor, then connect the cable to the adaptor before feeding it to the projector.
Turn on the projector and wait for it to warm up. Also, switch on the tablet or phone after the warm-up and the files or videos available in the portable device should display automatically. If they do not, refer to the user’s manual on how to go about it.
How Far to Sit from the Projector Screen?
Home theatre systems are a joy to have. They enhance the movie viewing experience to a level that was unimaginable some decades ago. However, there are a few factors that you need to consider to have the best movie viewing experience to make your free time pleasurable. Among these factors is the sitting position.
You cannot just sit anywhere when watching a movie through a projector. There’s that ideal position. But how do you get to that perfect position?
One of the most critical factors that determine the sitting position is the resolution of the projector. For example, the best sitting position for full HD TV with a resolution of 1920×1080 is 5 feet. On the other hand, you will need to be about 3 feet away if on a 4k monitor.
Clearly, the higher the resolution, the closer you will need to be to the display.
Another important consideration is the horizontal viewing angle. The field of view, as it is also known, is the angle from each corner of the projector display from the middle of the sitting position. In the majority of cases, 40° is the ideal angle. It is the sweet spot.
The formula for calculating the ideal horizontal viewing angle is Distance X 0.84 = Screen Size.
The vertical viewing angle will also determine how comfortable you are when viewing the movie. It is also how high you mount the screen. And while there is no standard as too high you can install the screen, anything more the 35 degrees angle from the sitting position to the center of the display would be uncomfortable.
How to Make Projector Wireless
Converting a project to wireless makes it convenient and easy to use. It makes it possible to be at one end of the room when the projector is at the center and not having to deal with the challenge of numerous wires.
Converting your projector to wireless is all possible with a wireless adaptor. So, how do you go about it?
The first step is to connect the wireless adaptor to the projector. You will need to do this using the provided cables that can either be USB or VGA.
The next step is to attach the wireless adaptor to the laptop. Typically, you connect the adaptor using a USB cable.
Switch on the computer and click on the found new hardware notification to install the adaptor. If the notification does not appear, you can use the installation cd that comes with the wireless adaptor.
After the installation, you should not have any problem projecting your material to the display.
How Much Power does a Projector Use?
There are different types of projectors, and each of them consumes power differently from the other. The number of lumens that a particular projector has determined whether it is energy efficient or not. The more it has, the more energy it consumes.
Another determinant is the projector technology. LCD tends to be heavier than LED, LCOS, and DLP. Please note that LCOS technology has the best picture quality and is energy efficient.
How to Clean Projector Filter
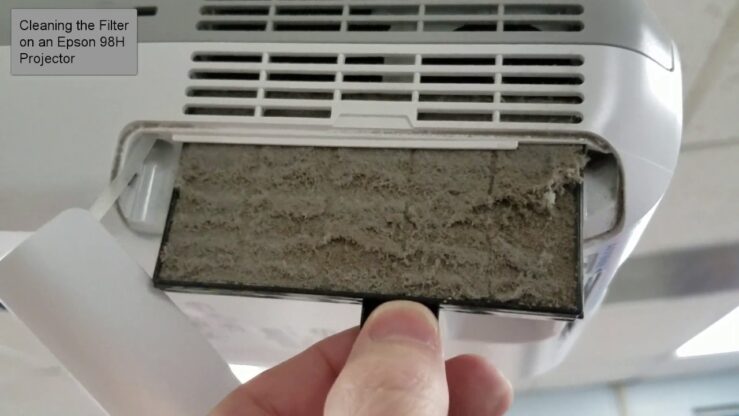
Cleaning the projector filter can enhance the picture quality and extend its life. But which are the situations that prompt cleaning the filter?
You should clean the filter when the vents or the filter itself gets dusty. You may also get a notification telling you to clean it. Typically, the projector light may flash orange. This is with some models.
Please make sure to go through the manual to identify the different notifications that come with a particular model.
Switch off the device and unplug it from the wall socket. Allow it to cool down before removing the filter.
The air filter cover may have a tab. Press and hold it to open. Take the air filter out, and tap on each side to remove any excess dust.
Refrain from using any excessive force as the filter is delicate and you can damage it. It can also become unstable and inefficient if it cracks. Avoid using canned air as you can push the dust to the lenses.
Use a vacuum to remove the remaining dust. And if it proves challenging to get rid of the dust, you may need to replace the filter as it may be damaged.
Place the filter back and replace the cover. You should feel a click when it goes back into place.
How to Use a Projector
The projector is one of the pieces that contribute to an ideal home theatre experience. Projectors have various uses that include presentations and lectures. At home, they are the best to use when watching movies and TV shows.
You can connect a Blu-ray player, DVD, and laptop among others to enjoy movies and videos. The majority of contemporary devices have an HDMI cable that transmits HD images and the best sound quality. If the input device does not have the cable, then you may need to purchase an adaptor.
After installing the projector in front of the screen, make sure that the events are unobstructed. Connect to the projector to the power source.
Install the HDMI cable on the appropriate ports in both the projector and the device that is going to provide the movie or images.
Switch the laptop or the DVD player on and select the display options to make the necessary changes. Some computer models require you to press the “Fn” key to access the options. Select video output to HDMI and move on to the next step.
You will need to use the focusing ring of the projector to focus the display appropriately. Make sure that the image is as clear as possible.
Use the calibration disk that usually comes with the projector in the computer or DVD player. Choose “Grid pattern.”
Adjust the lens to make sure that the image is square. If the shape of the image is like a pyramid, tilt it downwards. When everything falls in place, insert a movie disc and enjoy the movie.
How to Focus a Projector
Having a clear image from a projector is essential. After all, you are after good quality images to enhance your viewing experience. As a business, clear images say a lot about you. It indicates professionalism and good organization.
Maybe you have acquired a new projector, and the images are blurry. So, what do you do? Here are a few steps that you can follow to make the images from the projector clear and crisp.
The first thing that you do is locate a focus switch or ring. Some models may require you to manually adjust the lens to get a good image. You will also find others with a dial that you slide and others with a switch that you turn. If you cannot locate, they are adjusting mechanisms, consult your manual that came with the projector.
Switch on the projector, and the default display will appear on the wall or screen.
Turn the dial or switch until the image becomes clear and sharp. Of course, you will know when the image improves. That is the goal.
- Also Read: Best Projectors for Gaming: Review of Top 5 Projectors to Enhance Your Gaming Experience